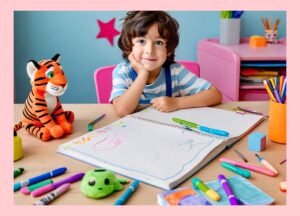
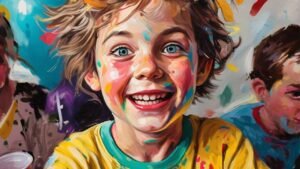
It is always fun and a good experience for children to be able to draw personal illustrations and at the same time be able to develop good basic skills. Of course, one may need to guide the child through the process, and even therein it’s possible to make the whole process as uncomplicated as well as entertaining as possible: In this blog post, I will share an approach to how kids can paint themselves –portraits by themselves with confidence. self-portrait for a kid.
You may also like Chinese Boy Names

Materials Needed:
Before diving into the steps, gather the following materials:
- Paper
- Pencil and eraser
- Pencils, pastels, felt pens, or paints preferably of pastel colors.
Step 1: Setting Up
- Choose a Comfortable Space: Choose a location in which the child will not be interrupted by other people, and where it is adequately lit for drawing.
- Gather Materials: Make sure that all that are required for use are within arm’s reach. It is ideally beneficial to have as many drawing instruments but to start, a pencil and paper are all that is needed. self-portrait for kid.
Step 2: Understanding Proportions
- Start with Basic Shapes: It is necessary to explain that every face of an object can be represented with basic geometric shapes, circles, and ovals. Illustrate using simple drawings on your piece of paper.
- Guide on Proportions: To enhance their sense of proportions, explain to children how big/where the eyes, the nose, and the mouth are per to each other and concerning the surface of the face and its margins.
Step 3: It is important to sketch the outline of the work.
- Draw Lightly: Remind the children to draw the contours of their face and head very lightly using a pencil. Stress the fact that it is perfectly normal to wipe off and tweak it from time to time.
- Include Details: Chicken can be added to the details of hair, ear, and neck. Teach them how to observe and put these elements in the paper reproducing what they see in the mirror or a picture.
Step 4: Making a Face Guess agregar mano obra facial (mukha)
- Eyes: Begin from the eyes, teach the student how to locate the eyes and draw them roughly in the middle of the face. Lastly, make simple almond oval shapes for the eyes.
- Note: Position the nose below the eyes and this also can be done using simple shapes such as triangles or curves. We show different nose shapes, they can also freely imagine and draw various nose shapes.
- Mouth: From the nation, draw the mouth below the nose and, if necessary, make them reflect on the size and form of lips and teeth when drawing.
Step 5:
Adding Personal Details Juries and offending complaints may contain additional information that is personal to the patients and victims respectively.
- Hair: Let children draw hair for their characters based on how long and thick it is, and how it is done. On certain body parts use lines and strokes to make it look like the hair type that is natural to the part for instance curly or straight hair.
- Clothing and Accessories: If needed, remind them of the possibility of adding additional clothes and accessories that will represent them. This step puts a friendly and warm feel into the portrait.
Step 6: Outlining and Clean up
- Erase Guidelines: As soon as the contour of the main elements is sketched, rub out all the preliminary directions and loose outlines on the portrait.
- Add Color (Optional): If using colored pencils, crayons, or markers to paint then the children can pick the skin color, hair color, and color of the clothes that would be worn by the portrayed person.
Step 7: The activity: to reflect and to share
- Reflection: It also means that the focus was on encouraging the kids to reflect on the artwork that they put on the poster. Such as, ‘What do you like about the portrait?’ or ‘What part did you find difficult to do?’
- Share and Display: Reward them and frame the self-portrait or place it in the refrigerator for all to see. It also gives them more confidence to practice more art and to express their inner selves better.
Step 8: Putting Little Twirls
- Shading: Introduce shading by softly mixing the darker tonalities within the areas of natural shading, like in the areas under the chins, eyes, and nose.
- Highlights: With the help of the eraser, now indicate the highlights on the forehead, on the bridge of the nose, and on the cheekbones. This puts depth into the picture.
Step 9: Refining Details
- Facial Features: Continue getting kids to improve the details of their eyes, nose, and mouth. This is where you have to focus on such things as eyelashes, eyebrows, and even the shape of one’s lips.
- Textures: The texture may range from smooth skin, rough hair, and soft cloth among others. If you are working on a picture of such a texture, you should use different techniques of drawing to depict it realistically.
Step 10: Background
- Choose a Background: Choose where to take the picture and to what background. It can be a plain color or a complex picture whatever the kids prefer to go for.
- Draw the Background: Assist them in drawing the chosen background around the portrait. It has to be enhanced instead of being a distraction to the main topic.
Step 11:
- The next steps that were identified in the previously mentioned steps to execute this plan are;
- Review the Portrait: At this stage, tell your child to produce a complete canvas and see it by stepping back and looking over the portrait as a whole. They must be asked what they like about the template and any changes that they would like to make or add-ons they may need.
- Make Adjustments: This would enable them to perform the final touches on their drawing. This may involve such things as smoothening the lines, adding more depth to them, or even changing the colors slightly.
Step 12:
- They interpreted signing the artwork as one of formality, as a way to underline and reaffirm the readiness and the desire to act. self-portrait for kid.
- Signing the Portrait: Make the children affix their signatures to the pieces they draw. This provides an element of the personal sense and of pride and ownership in what the class achieved.
Step 13: During the Sharing & Feedback activity, the following was evident.
- Share with Others: Let the family members and friends see the self-portrait and congratulate you. Ask your child to describe his or her thinking in creating the art piece as well as what motivated them.
- Receive Feedback: Stress the positive way of giving feedback. Compliments can be inspiring while criticism can be helpful in the subsequent artwork of the artist.
Step 14:
- Source: Hernon Quilio (2012) when considering the experience of attending an academic institution the following questions can be used.
- Discuss the Experience: Engage the child in a discussion of all the stages that went into the production of that particular drawing. Examples of such questions could be “What did you like most about it?” and “What would you do next time, if given a chance? ”
Step 15:
- When viewing the portrait, the spectator is intended to be exposed to the following themes:
- Choose Display Location: Discuss where in the house you would like to hang up the completed and framed self-portrait. Choices may be Their room, art area, or any open space within the house.
Step 16:
- Frame the Portrait (Optional): They should consider wrapping the artwork in some way to protect it and also give it a slick appearance. This can also make it feel more special especially when an individual is particular on the kind of fruit they want to eat.
- Set Artistic Goals: Help your child to have objectives that he or she wants to achieve through the artworks he or she wants to do in the future. This could be by adopting a new approach to drawing or aiming at painting other objects or creations and joining art competitions.
Step 17: Practicing Regularly
- Encourage Regular Practice: Stress the fact that drawing should be performed regularly. Present chances for them to draw on their own and be innovative as much as possible.
Step 18:
- From The Life and Times of Tim show the comedian draws out different mediums to get his jokes across.
- Experiment with Mediums: Bring into the class new styles of drawing for example charcoal, pastels, or new tools related to digital art form. This further develops creative capability and also risk-taking.
Step 19: Membership in Art Classes or Clubs
- Explore Art Classes: It is recommended to take your child to art lessons or join groups or art classes where they can learn from tutors and other kid-art lovers. self portrait for kid.
Step 20: Documenting Progress
Create an Art Portfolio: Opening an art portfolio is important because it will help one to track the artwork of the child over time. This has the added advantage of giving a physical record of their development and success as an artist.

Conclusion
To me sketching is not only the physical exercise of putting a pencil on the paper and copying what one sees; it is fun, art, individuality, and discovery. To expand the experience for the child and build his or her passion for art, try to do the following steps: Help the child practice more on imaginative arts, and teach them about the fun they can get from the simple process of creating an art piece. Happy drawing!
Building on these steps you can offer a detailed guide in addition to teaching children how to achieve a desired drawing outcome, which would also help children be creative, think about themselves, and develop as artists.
Explore Oil Pastel Art