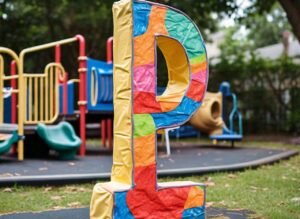
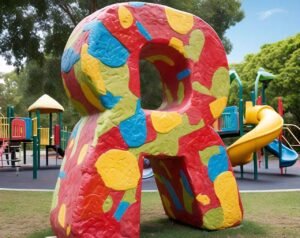
Using scrap paper to make paper mache letters, numbers, and shapes is a great craft for children and adults. These can be designed to be specific decorative pieces for one occasion or individual or items for classroom usage. To do this, the following are fresh and handy tips that will help anyone who wants to make their paper mache from scratch.
Explore Female Penguin Names

MATERIALS NEEDED
Before starting, gather the following materials:
CARDBOARD OR HEAVY PAPER:
There is an additional set of items attached to the preceding during the process.
For the base shape.
- Paper Strips: Newspaper or any scrap paper NOW you need narrow strips.
- Adhesive: A mixture of white glue diluted with water or a legendary flour-water paste.
- Paints: Finish paints to use, may be acrylic or tempera.
- Brushes: It is used when applying paste and paint is required.
- Plastic Wrap or Wax Paper: To shield the surfaces.
- Scissors or Craft Knife: For cutting the base shapes as shown in the figure below.
- Masking Tape: To put into one or the other connection and fix in its place the base shapes formed above.
SHAPE DESIGN
- A play decision that must be made is to decide which letter, number, or shape you desire. When drawing the design, it has to be drawn on cardboard especially if it is to be cut out; this design must also be to scale. Do not forget that greater designs are considerably easier to manipulate and are more long-lasting.
- Erase out the shape of the base.
- With the scissors craft knife, start tracing the design on cardboard, then proceed and cut out the design you have drawn. If you are making something in the shape of a three-sided figure, join another piece of the same shape.
- The last drop of the show is the invitation to Assemble the Shape, a contemporary sculpture trail by Gerry Judah, with manholes covered in billboards with the brand’s logo.
- For making the 3D letter numbers, utilize small strips of cardboard from the side of it. Cover these strips with the help of masking tape with the base shapes and align them in such a way that in the end, you get a structure resembling a box. Make sure that the sides are flat and tightly joined for the figure to hold its respective shape.
- Before you start with the Paper Mache technique, it is imperative to prepare the Paper Mache paste which is relatively easy to do.
- Combining an equal portion of white glue with an equal portion of water is recommended; or a slurry of flour and water, one to one. Submitting the mixture until it becomes smooth. It should be of a cream-like consistency and should be as thick as that of the batter which is used to prepare pancakes.
- It is without any doubt that applying the Paper Mache is quite easy and more satisfying in this experimentation as compared to the previous one.
- Don’t work on a surface that can get stained; it’s advisable to cover the surface with plastic wrap or wax paper as this will prevent spots. Submerge the obtained paper strips into the paste, tapping off the extra by rubbing the strip between two fingers. The strips are then placed on your base shape, it is advisable to reshape them and make sure that they slightly overlap so that none of the shape is left uncovered. Just pat and iron it as you progress with the process to eliminate any folds or formation of bubbles.
LAYER AND DRY
- Complete at least two layers of the paper mache for the best results of your project. Each of the implemented layers should be allowed to dry before the next layer is applied. Drying depends on the amount of humidity in the layers and the densities of the layers it may take hours to a day. You can use a fan to hasten the drying-up process or just put the shape in the room with good air circulation.
SANDING (OPTIONAL)
- After the wood is thoroughly dried out, one may polish it using fine-grit sandpaper for a better finish eliminating any high spot bumps. Although this step is not mandatory, it is highly encouraged to do this to make the finish look professional.
- Wall finishing Activities the two of them entail painting and decorating;
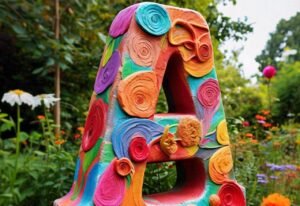
- Color your paper mâché shape with your preferred choice of colors. It is the best suitable for using Acrylic paints because it can cover a large area of the wall and can last for a longer period. Give time and let it dry so that the succeeding layers of paint can be put on smoothly. Glitters, stickers, and decoupage can also be used to enhance the face shape as per the specific individual’s desires.
ADD TEXTURE
If you wish to add bumpiness to your paper mache shapes, then you can use tissue paper, crepe paper, and such textured paper. The newspaper strips should be followed in the same manner as the comics because the paste is used to attach them.
CARVED FLOURISH
- This is done when you have more detailed designs – cut smaller and finer pieces of cardboard then attach them to your base shape. Such pieces should be masked using masking tape before being concealed with the paper mache.
- Use a mold From the above analysis, it can be concluded that the use of a mold can be recommended for the company to enhance its performance.
- This is preferred if one wants things to look standard and as professional as possible in their appearance. Of course, with most of these, you can form mold from clay, and foam, to plastic containers. Apply a release agent on the mold before proceeding to apply the paper mache strips.
SUPPORT WITH WIRE
To enhance rigidity, of course, where necessary or where the size or complexity of the shape demands it, you can use wire or pipe cleaners to make the framework. Wire the cardboard base and then proceed with the paper mache stages and attach the wire before covering it with the paper mache.
CLOSE WITH A SEALANT
When painting is done, cover your paper mache figures with Mod Podge or use a clear acrylic spray to give it a glossy look and protect it. This is particularly helpful if the creation you will be creating is likely to be handled often or comes into contact with water.
MOUNTING AND HANGING
- If you are to hang your letters or shapes, it’s advisable to include a mounting system. Hook strings, strips of adhesive, or anything similar at the back part of the creation done. Make sure that these are tight in the layers of the paper mache.
- Make sure that its structure is empty.
- To reduce the mass and improve the maneuverability of the paper mache shapes, design the structure to have an inner void. Place balloons, balls, or other inflatable objects base and after that dismantle them when it is time to remove and reuse them after the paper mache process is over and the paper mache has become hard enough.
INCORPORATE LIGHTS
To make the overall look magical, install LED lights into the plan or the decor. Screw or stick the small circular bulb lights or incorporate some slots on the paper mache shape.
TIPS AND TRICKS
- Consistency: Do not create lumps in your paste so keep the respective paste ratio the same and even. In cases where flour paste is opted for, the flour should be sieved before application in the mixing process.
- Durability: To enhance the quality of the packaging material which is paper, then use kraft paper in the final layer of the packaging material.
- Customization: From experimentation of different shaped candles creating novelty output shapes. Often, it is possible to attempt to arrange the toys in a way that reflects the holiday or event, for instance, in the case of Halloween.
CONCLUSION
Thus, it can be said that creating paper mache letters, numbers and shapes is a rather playful and interesting activity. Apart from introducing nature and the possibility of artistic work, this craft also leads to the creation of unique home decor items. Wherever one or several name signs are needed, such as in a child’s room, for creating a unique party, or in education where laminated name signs are used, paper mache never ceases to amaze. If you would take your time and also apply creativity, then you will be able to come up with cute and lasting work-from-home designs for your goals.
You Can Also Like This Paper Bag Crafts for Kids